Fed-BioMed Workflow
We present in the following page a short step-by-step illustration detailing the workflow of Fed-BioMed.
The steps are:
- Setting up the
Nodes - Deploying dataset on
Nodes - Write a Federated Model
- Run and monitor a Federated Model
- Model retrieval and evaluation
Step 1: Setting up the Nodes.
In order to run Fed-BioMed, you need to start first one or several Nodes. When starting the Nodes, each of them will try to connect to the Researcher, as shown in the diagram below (Diagram 1). The connection will fail if the researcher component is not up and running, and the nodes will retry to connect every 2 seconds until they create a successful connection with the researcher server.
Nodes have only out-bound requests
Nodes only send out-bound connection requests and doesn't have in-bound connections. Shortly, nodes are client rather than a server.
 Diagram 1:
 Nodes in Fed-BioMed, and long polling RPC calls to researcher server.
Step 2: Deploying a dataset on the Nodes.
The nodes store the datasets locally in the file system where they run. Each dataset needs to be registered/deployed using the Node GUI or Node CLI. This process identifies the dataset to be able to use in training.
Step 2.1: Loading a dataset into a Node.
Fed-BioMed supports standard data sources, such as .csv files and image folders, and provides specific tools for loading medical data formats, such as medical imaging, signals and genomics information (Diagram 2).
 Diagram 2: loading data into a
 Node. Different data types are available, especially for medical datasets.
After a dataset is deployed, Node will be able to train the models submitted by the Researcher. The user (researcher) must specify the tag that identifies the dataset. Please refer to Diagram 4 to see the example of dataset identifiers as well as the tags associated.
 Diagram 3:
 Nodes with respective datasets loaded.
Step 2.2: Retrieving Nodes dataset information on the Researcher side.
It is possible for the Researcher to obtain information about the dataset of each Node, as shown in the diagram 4 below.  Diagram 4:
 Node datasets information that Researcher can retrieve. The researcher can access datasets' metadata such as datasets name, dataset data_type, dataset tags, description and shape stored on each node.
Step 3: Write a federated Model (TrainingPlan, Aggregator and Strategy)
To create a Federated Model Experiment in Fed-BioMed, three principal ingredients must be provided:
- a
Training Plan, which is basically a Python class, containing the model definition and related objects, such as cost function and optimizer, and eventually methods for pre-processing (e.g., data standardization and/or imputation), and post-processing (run after that the training of the model on theNodeis completed). - an
Aggregatorthat defines how the model parameters obtained on each node after training are aggregated once received by theResearcher. Examples ofAggregatorcan beFedProxorSCAFFOLD. - a
Strategythat handles both node sampling and node management (e.g., how to deal with non responding nodes).
 Diagram 5: the ingredients needed to train a Federated Model in Fed-BioMed.
Step 4: How to run and monitor an Experiment
Running an Experiment
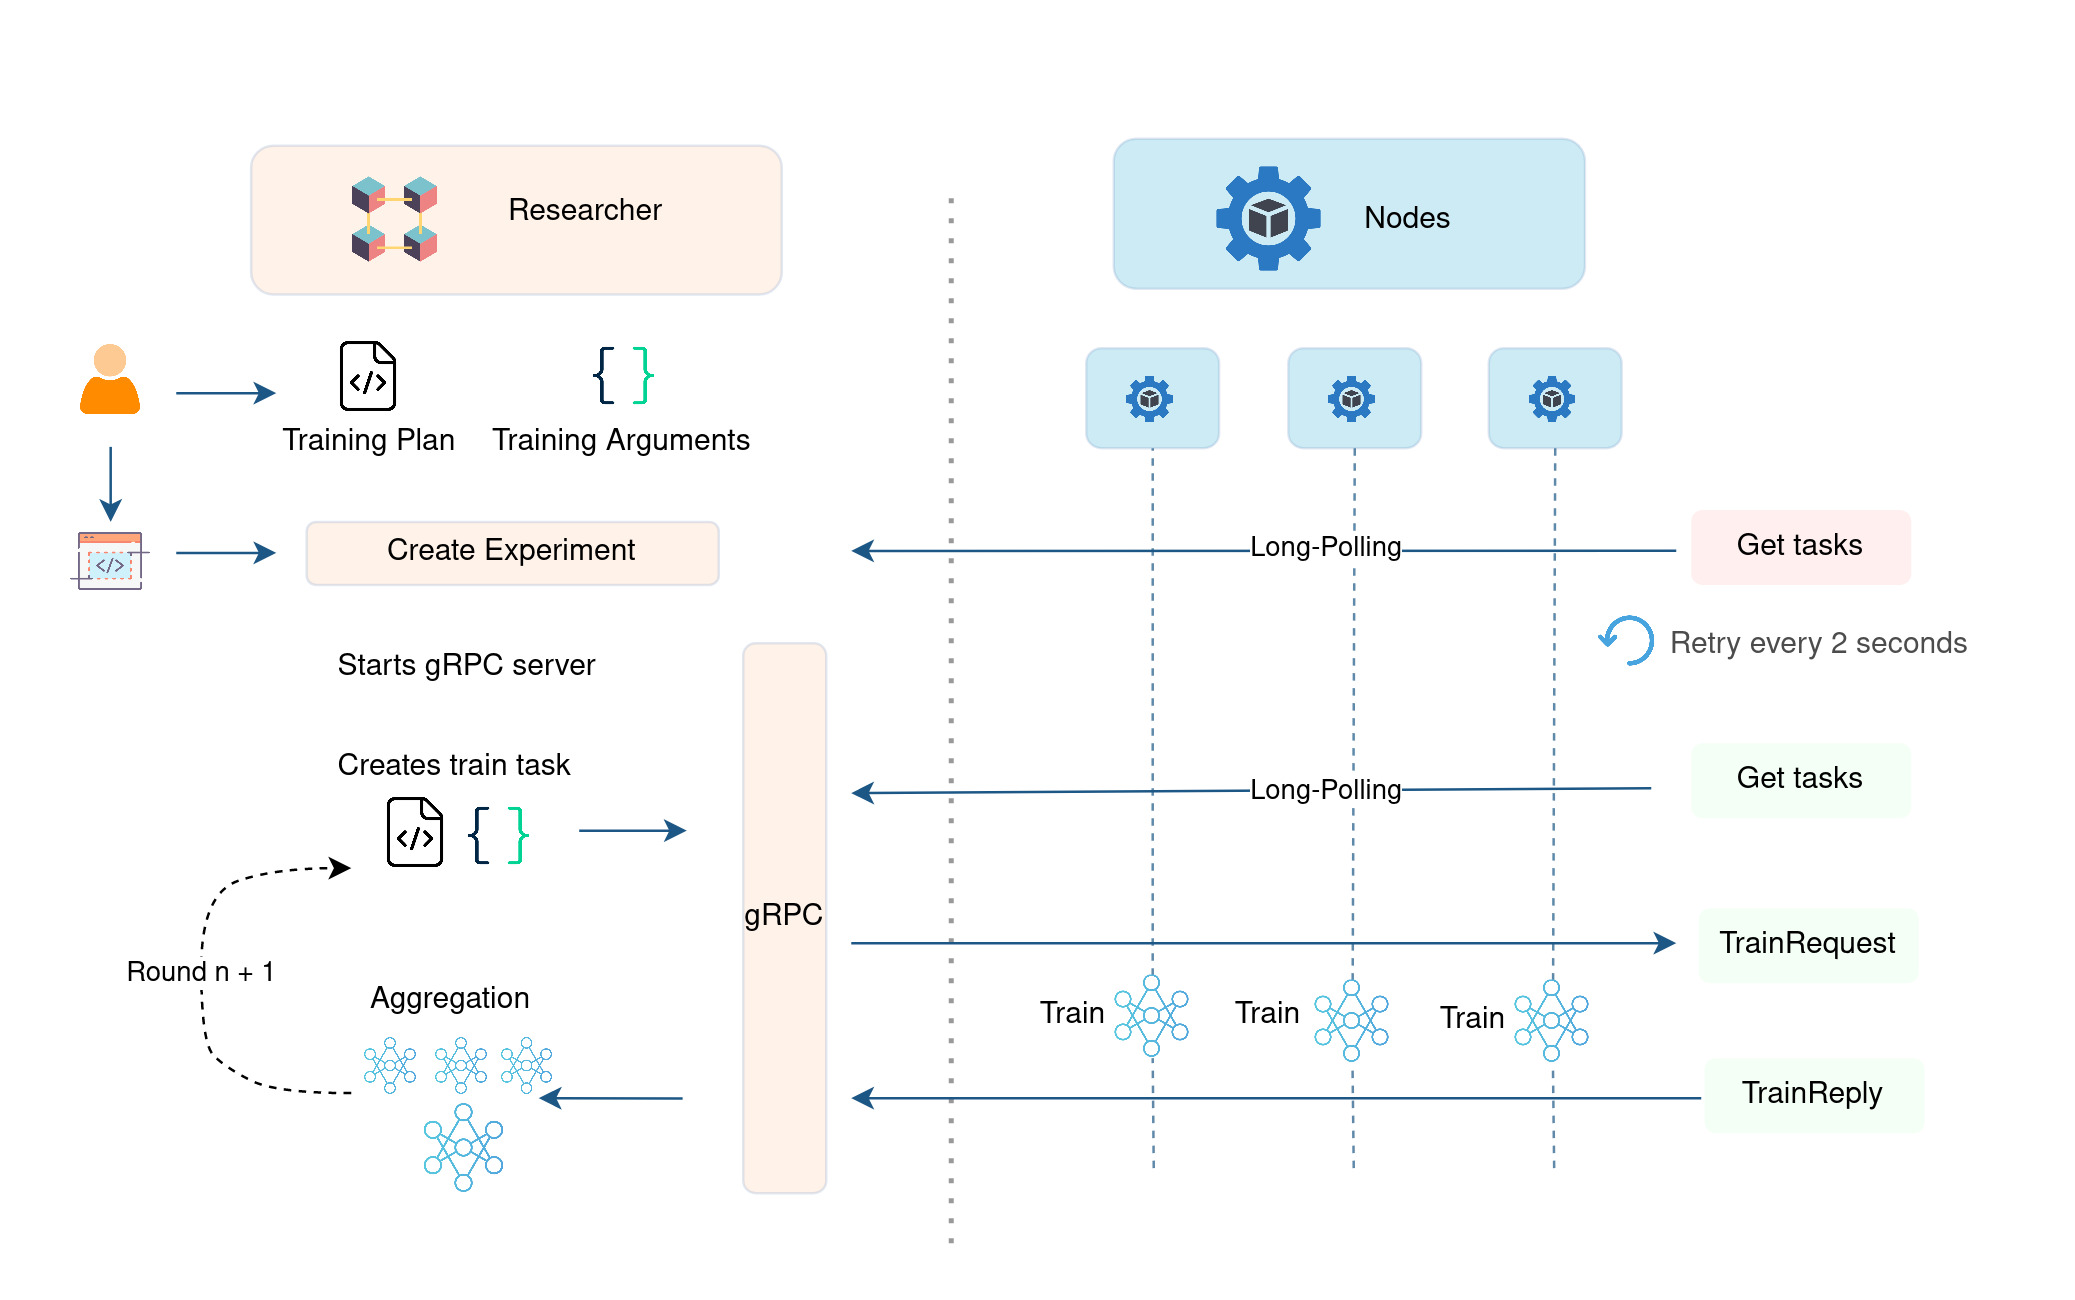
The following Diagram 6 provides a technical description of the training process within Fed-BioMed:
-
After the nodes are started they sent constant request to the researcher in order to retrieve the training task (request).
-
The user/researcher creates and experiment with training plan and the required arguments for the training round.
- The global model along with the training arguments is packaged as
TrainRequestand sent to theNodes. The package contains the training plan, experiment info, dataset identifier (tag) and the arguments for the training round. - Each
Nodetrains the model on the data locally stored. - The resulting optimized local models are sent back to the
ResearcherasTrainReply; - The shared local models are aggregated to form a new aggregated global model using the
Aggregator.
 Diagram 6: Showcasing an iteration of federated training in Fed-BioMed.
 Diagram 7: Alternate view of an iteration of federated training in Fed-BioMed.
Monitoring an Experiment.
The loss evolution is sent back to the Researcher at each evaluation step during the training. The Researcher can keep track of the loss using Tensorboard, as shown in Diagram 8.
 Diagram 8: model training monitoring facility available in Fed-BioMed
Step 5: retrieving the model and performing model evaluation
Once federated training is complete, the Researcher can retrieve the final global model, as well as other relevant information such as the timing between each connection, loss and the testing metrics value (if a validation dataset is provided). Fed-BioMed provides a number of standard metrics, such as accuracy for classification, or mean squared error for regression, and allows the definition of custom ones.
 Diagram 9: model and results collected after training a model using Fed-BioMed framework.
Going Further
Detailed steps on how to install Fed-BioMed on your computer.
More tutorials, examples and how-to.
Provides an exhaustive overview of Fed-BioMed Nodes.
Researcher configuration Guide
Provides additional info on Fed-BioMed Researcher.


