Displaying Loss Values on Tensorboard
Tensorboard is one of the most useful tools to display various metrics during the training. Fed-BioMed offers an option to display loss values on the tensorboard interface. This article focuses on how to use tensorboard on Fed-BioMed to display loss values during the training rounds in each node. This section is presented as follows:
- Running experiment with tensorboard option
- Launching tensorboard
- Using tensorboard
The tensorboard logs of an experiment is saved in a directory, by default TENSORBOARD_FOLDER_NAME inside the experiment folder. See below to learn how to specify a directory.
Breakpoints currently do not save tensorboard monitoring status and tensorboard logs. If you continue from a breakpoint, tensorboard monitoring is not restarted and logs from pre-breakpoint run are not restored.
Running Experiment with Tensorboard Option
During the training of each round, scalar values are sent by each node through the monitoring channel. The experiment does not write scalar values to the event file as long as it has been specified. To do that you need to set tensorboard=True while you are initializing an experiment (see below). Afterward, the Monitor will be activated, and it will write the loss values coming from each node into a new log file. Thanks to that, it is possible to display and compare on the tensorboard loss evolution (and model performances) trained on each node. By default, losses are saved in files under the folder runs inside the experiment directory.
from fedbiomed.researcher.federated_workflows import Experiment


exp = Experiment(tags=tags,
                 model_args=model_args,
                 training_plan_class=MyTrainingPlan,
                 training_args=training_args,
                 round_limit=rounds,
                 aggregator=FedAverage(),
                 node_selection_strategy=None,
                 tensorboard=True
                )
Validation facility
Tensorboard displays the results of the validation/testing steps. During each Round, values will be exported into Tensorboard in real time. If test_batch_size is set to a specific value, each computed value will be reported (depending on the size of test_batch_size set).
Launching Tensorboard
1. From Jupyter Notebook
It is possible to launch a tensorboard inside the Jupyter notebook with the tensorboard extension. Therefore, before launching the tensorboard from the notebook you need to load the tensorboard extension. It is important to launch the tensorboard before running the experiment in the notebook. Otherwise, you will have to wait until the experiment is done to be able to launch the tensorboard because the notebook kernel will be busy running the model training.
First, please run the following command in another cell of your notebook to load the tensorboard extension.
%load_ext tensorboard
Afterward, you will be able to start the tensorboard. It is important to pass the correct path to the runs directory. The file runs is created by default inside the experiment folder and can be recovered once the experiment has been declared using tensorboard_results_path.
TENSORBOARD_RESULTS_DIR = exp.tensorboard_results_path
Then, you can pass the path to --logdir parameter of the tensorboard command. Please create a new cell and run the following command to start the tensorboard.
tensorboard --logdir "$TENSORBOARD_RESULTS_DIR"
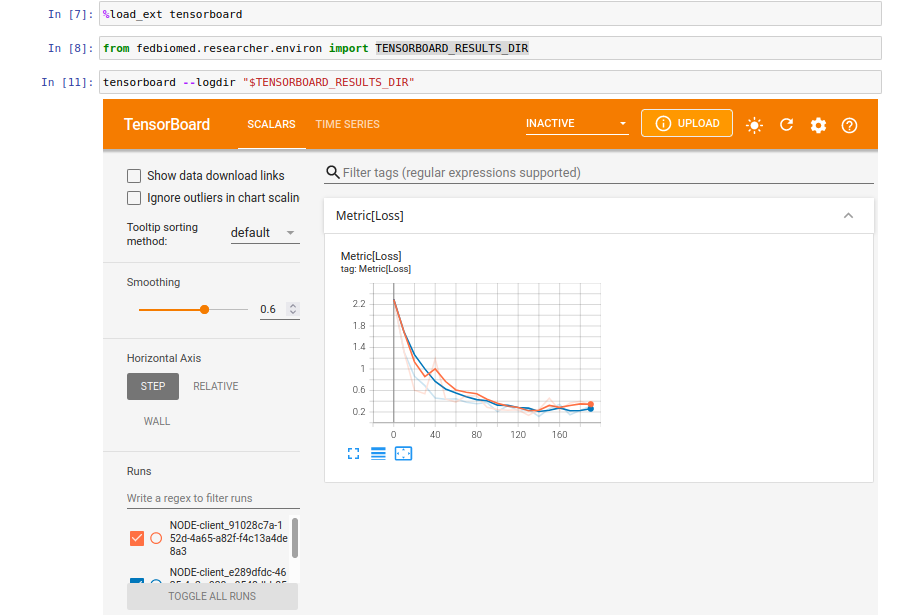
Afterward, the tensorboard interface will be displayed inside the notebook cell.
2. From Terminal
Tensorboard comes with the fedbiomed-researcher conda environment. Therefore, please make sure that you have activated the conda fedbiomed-researcher environment in your new terminal window before launching the tensorboard. You can either activate the conda environment using conda activate fedbiomed-researcher or ${FEDBIOMED_DIR}/scripts/fedbiomed-environment researcher.
You can launch the tensorboard while your experiment is running or not. If you launch the tensorboard before running your experiment, it won't show any result at first. After running the experiment, it will save tensorboard event logs into the runs directory during the training. Afterward, you can refresh tensorboard page to see the current results.
While you are launching the tensorboard, you need to pass the correct logs directory with --logdir parameter. Once the path has been recovered using exp.tensorboard_results_path it can be given to the shell:
$ tensorboard --logdir $TENSORBOARD_RESULTS_DIR
Using Tensorboard
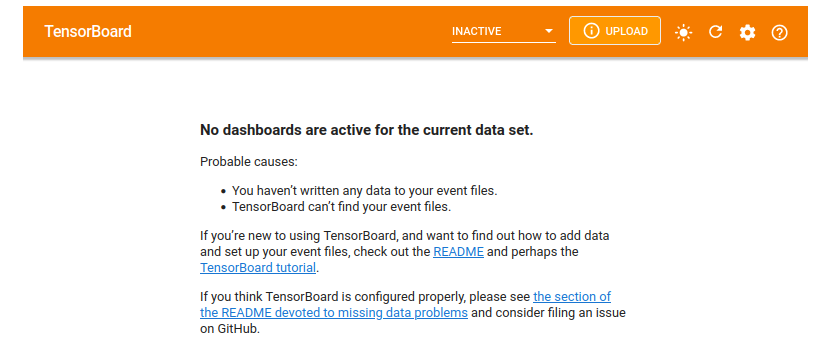
After launching the tensorboard it will open a interface. If you haven't run your experiment yet, tensorboard will say No dashboard is active for the current data set. as seen in the following image. It is because there is no logs file that has been written in the runs directory.

After running your experiment, it will start to write loss values into tensorboard log files. You can refresh the tensorboard by clicking the refresh button located at the right top menu of the tensorboard view.

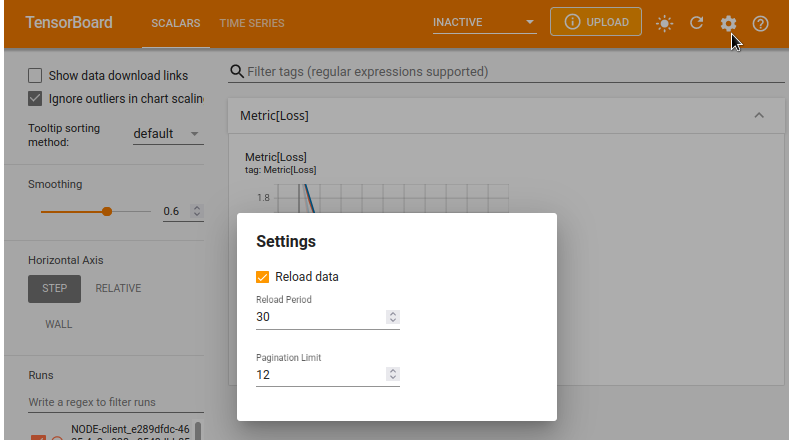
By default, the tensorboard doesn't set a time period to refresh the scalar values on the interface. You can click the gear button at the top right corner to set reload period to update the interface. The minimum reload period is 30 seconds. It means that the tensorboard interface will refresh itself every 30 seconds.

Conclusions
You can visit tensorboard documentation page to have more information about using tensorboard. Tensorboard can be used for all training plans provided by Fed-BioMed (including Pytorch an scikit-Learn training plans). Currently, in Fed-BioMed, tensorboard has been configured to display only loss values during training in each node. In the future, there might be extra indicators / statistics such as accuracy. Stay tuned!


